Giant Bubble Recipe

Ingredients

Liquid Dawn Detergent
Glycerin
Gallon Container

Directions

Measure 6 cups of water into one container, then pour 1 cup of Dawn dish soap into the water and slowly stir it until the soap is mixed in. Try not to let foam or bubbles form while you stir. Measure 1 tablespoon of glycerin and add it to the container. Stir the solution until it is mixed together.

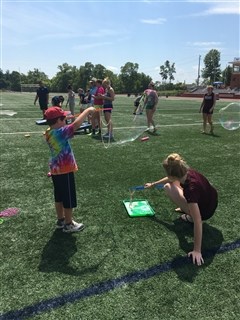
Use various bubble blowing instruments for blowing large bubbles (e.g. plastic funnels, pool noodles, large bubble wands)

Contact Paper Collage

Materials

Clear contact paper
Variety of materials for collage – tissue paper, feathers, foam pieces, construction paper,
Tape

Instructions

Cut of a large piece of clear contact paper. Peel the paper of the back side.  Tape contact paper to the table or window, sticky side up.  Provide various materials to stick onto contact paper to make an interesting collage.  Once completed, place sticky side of contact paper against a window and note how light shines through the collage.

How to Make Really Good Play Dough

Spring colors and spring cookie cutters!

Ingredients

1 cup flour
1/2 cup salt
2 teaspoons cream of tartar (alum works well, too)
1 cup water
2 tablespoons vegetable oil
food coloring (use icing gels for more vibrant colors)

Instructions

  1. Heat water, oil, and food coloring in saucepan until boiling.
  2. Mix flour, salt, and cream of tartar and add to heated water mixture, mixing until dry ingredients are moistened. Do not let mixutre stick to the pot. 
  3. Dump the mixture onto a cookie sheet or tray and let it cool slightly.
  4. Knead, knead, and knead! The secret to great play dough is in the kneading. Knead until soft and smooth. When it’s cool enough, children can help with this part.

Play dough will keep in a tightly lidded container for a few months.

Painting with Sensory Balls

Materials

Large box
Construction paper
2-4 sensory balls
Tempera paint 
Cereal bowls or containers for paint
1 large spoon for each color of paint
Glitter (optional)

Directions

Pour paint into the bowls. Place 1-2 sensory balls in each bowl of paint. Lay a piece of construction paper on the bottom of the box. Using a spoon, drop 1-2 sensory balls from the paint into the box. Invite your child to shake and tilt the box. Observe.  Place the balls back in the paint. Continue the process until your child is satisfied with the painting.
Optional: While the paint is wet, sprinkle a little glitter on the painting to give it some sparkle!

Toddler Art: It’s the Process, Not the Product

Art for young children is a learning experience when children are discovering what is stimulating, interesting, and engaging.  They are most interested in experimenting and doing art rather than making a finished product.  During the process, the children experience the joy of exploration, the delight of creating, and sometimes the frustration of challenges.

The art process can be sensory, such as feeling slippery cool paint on bare fingers.  Other times it is a mysterious surprise as colors blend unexpectedly.  The adult’s job is simply to allow this process to happen!  Provide interesting materials, offer help with materials that may be challenging to use, but it is best not to make art samples to copy, as this tends to limit the possibilities of the process and may hinder the world of discovery and creativity.

When communicating to children about their artwork, it is helpful to use open-ended comments that continue to encourage children to explore.  Examples include:
  •  Tell me about your artwork (painting, drawing, playdough)
  •  I see you’ve used many colors!
  •  How does the paint feel?
  •  Tell me about the _____ part.
 
Suggested Art Materials:
  •  Varieties of paper
  •  Glue, paste, tapes
  •  Paints, chalk
  •  Fabric, yarn
  •  Scissors
  •  Natural materials
  •  Recycled materials (cardboard tubes, plastic milk jugs, junk mail)
  •  Various writing instruments (crayons, markers, colored pencils)

“Donut” Printing

Materials

Pool noodle cut in 2-3 inch segments
Large paper
Tempera paint
Paper plate

Directions

Pour a small amount of tempera paint on a paper plate. Invite your child to gently press the end of the pool noodle segment into the paint and then press it onto the paper.  The noodle makes fun donut-shaped prints. Dry completely and display.

Cupcake Flannel Board Play

Materials

Various colors of felt
Sharpie
Scissors

Directions

Using a Sharpie marker, draw bottoms of cupcakes (cupcake papers) on various colors of felt. Cut out bottoms.  Draw cupcake tops using various felt colors. Cut out cupcake tops.  Using scraps of felt, cut out various shapes for decorations (e.g. cherries, sprinkles, candles, hearts, etc.) Using a board covered with flannel or a carpeted area, invite your child to create various cupcakes. Your child will enjoy creating and recreating many kinds of cupcakes.  Have fun!

Patterns with Cupcake Foam Stickers

Materials

Muffin pan
Cupcake Foam Stickers

Directions

Provide cupcake foam stickers. For younger children, you may want to limit the stickers to two different kinds. For older preschool age children, provide a variety of stickers to encourage more interesting and challening patterns.  To introduce the idea of a pattern to your child, start with just two different stickers and place them in the muffin pan using an ABAB pattern. Invite your child to copy the same pattern in the row underneath. Once your child has mastered copying a pattern, ask him to extend your pattern by asking what comes next in the pattern.  This will help you determine if you child understands that a pattern repeats.  The last step is generating his own patterns and learning how to make more complex patterns using 3, 4, or more different objects. 

Understanding the concept of patterns help children see patterns in numbers, literacy, music, and all around them!

Pig Pancakes

Ingredients

Pancake Mix
Raisins
Stawberries
Bananas

Directions

Make pancakes as directed. Cut a strawberry in half from top to bottom and place at the top of the cooked pancake.  Add raisins for eyes and a banana button for the nose.  Place two more raisins on the banana to complete the snout.  Enjoy as a special breakfast or morning snack.

Puffy Paint Cookies

Ingredients

White glue
Plain shaving cream
Brown Tempera paint
Spoon
Bowl
Paper plate
Brown paper
Circle paper punch

Directions

Put 3/4 cup of shaving cream and 1/4 cup of white glue into a bowl and mix. Add in some brown paint and mix well. Glop it on the paper plate, taking your time to feel it in all it’s goopiness. While your child is playing/painting the plate cut out some “chocolate chips” from the paper. Add them to the cookie. Dry completely.