Traveling with Baby

At a recent parent seminar, parents shared tips on traveling with infants. The parents have found that, for the most part, car trips with a baby go well. They’re often surprised to find that infants can travel happily even though confined to a car seat on long trips. Infants enjoy the closeness of family members and the movement of the car. 

Here were some pointers offered: 

  • A car seat padded with a head support and strap covers can add to the comfort of a young infant. 
  • Making frequent stops is helpful. A dad commented that he had been used to driving in long shifts, but when he re-geared his thinking to making more frequent stops for the baby, he found it enjoyable. The baby introduced them to fellow travelers, who came over to admire the tiny infant and started conversations. 
  • Places for changing diapers were improvised. A changing pad in the back of the car or back (with the car stopped!) worked well for one family. Some parents also used the back seat for feeding baby. 
  • Extra equipment needed for babies (e.g. stroller, diapers, extra food and clothing) fill up a car, but parents found that planning ahead and having the needed equipment and supplies made for a smoother trip. 
  • Nursing moms find feeding baby during travel is easy. Parents of bottle babies can check ahead and make sure the type of formula they’re using is available at their destination to eliminate the need to bring a large supply. 
  • Taking some good toys is a must, as babies become avid explorers of objects. Some new little items to hold and mouth will keep baby busy. Items from the house, such as an empty wipes container, or toys with moving parts will appeal. Look for ways to make the toys available for baby. Attach dangling toys to the handle of the car carrier. A busy surprise box with pop-up figures is usually worth the space it takes for a baby over ten months old. 
  • Don’t forget board books, singing with your child, and children’s music.

Chocolate No-Cook Play Dough

Ingredients

1 1/2 cups of flour
1/2 cup cocoa powder
1/2 cup salt
tablespoon of oil
1 cup warm water approx

Directions


Invite your child to help measure and stir the dry ingredients together first. Pour in oil and warm water.  Stir some more until it makes a dough.  Dump the playdough onto a hard surface and with the help of your little one, knead the dough until it is smooth. Add more water if it is crumbly, add a little more flour if it is too sticky.  

Remind your cihild not to eat the playdough!  It smells so good!

Fine Motor Extension:  Provide uncooked spaghetti and Cheerios  (we used chocolate Cheerios!) and invite your child to stick pieces of spaghetti into a ball of playdough and then thread Cheerios onto it.

Dissolving Teddy Bears

Materials
Teddy Grahams
Milk
Bowl
Spoon
Timer or stopwatch (optional)

Directions
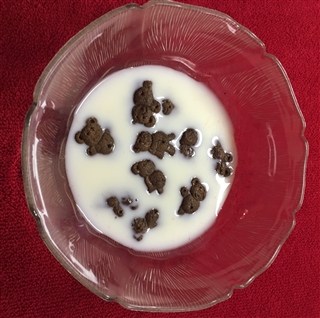
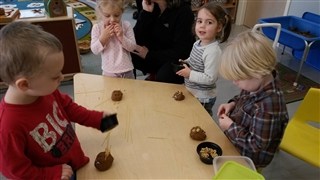
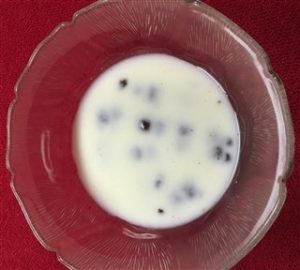
Toddlers will just have fun watching the teddy grahams dissolve in the milk.  You will want to expose them to new words like: dissolved, mushy, absorb, and introduce them to a stopwatch, if you decide to use one. 

For preschool age children, you may want to expand the learning and include making predictions, describing observations, and talking about who came the closest with their prediction?  Check out this website for more ideas.

Have fun!

Paper Plate Teddy Bear

Materials
2 Paper plate
Stapler
Bown tempera paint 
White school glue
Shaving cream
Paint brush
Plastic fork
Construction paper
Scissors
Glue stick

Directions
Mix paint by adding equal parts of school glue with shaving cream.  Add brown tempera paint to the mixture. Cut two small circles for the ears out of one of the paper plates.  Staple the ears to the top of the other paper plate. Invite your child to use a sponge brush or regular paint brush to paint the paper plate and ears. Ecourage your child to make the paint thick on the plates.  Once the paint is dry, add details by gluing construction paper onto the plate: meke eyes, inside of the ears, nose, and use a Sharpie marker to make a mouth. 

Read a teddy bear book together!

Sorting Teddy Grahams

Materials
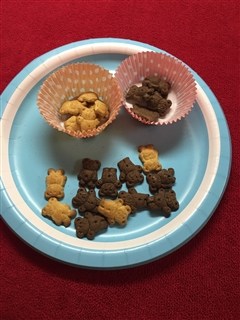
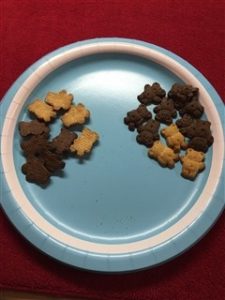
2 different kinds of teddy grahams (chocolate, honey)
1 plate
2 small containers (we used cupcake baking cups)

Directions
Pour a few of each kind of teddy grahams onto a paper plate. Invite your child to sort the teddy grahams iby color (flavor), placing all the chocolate teddy grahams in one of the cupcake baking cups and all of the honey teddy grahams into the other baking cup. Count each cup. Which one has more? Which one is your child’s favorite teddy graham?

Lesson Extensions 
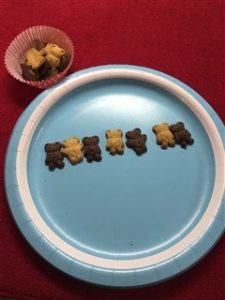
1. Sort the teddy grahams by front and back. When pouring a few onto the plate, sort into two piles – teddy grahams facing up and teddy grahamns facing down. 
2. Make patterns with the teddy grahams. 

Sponge Paint on Teddy Bear Shape

Materials
Teddy bear shape – cut from construction paper
Brown Tempera Paint
Construction Paper (small scraps)
Large googly eyes (optional)
Sponge paint brush
Sharpie marker
Scissors
Glue stick

Directions
Cover workspace with newspaper. Place brown paint on a paper plate or small plastic container. Invite your child to use a sponge paint brush and paint the surface of the teddy bear shape. Once the paint has dried, cut a small triangle for the nose, glue on googly eyes (or cut circles for the eyes), and draw a mouth using a Sharpie marker. Display.

Teddy Bear Sorting

Materials
Variety of teddy bears in various sizes and colors

Directions
Encourage your child to sort the teddy bears in a variety of ways – size (small, medium, large), color, clothing vs. no clothing.  Ask your preschooler if he can think of a new way to sort the teddy bears.

After sorting, curl up with a favorite teddy bear and read a teddy bear story.

Exploring Fall Leaves

Materials
Fall Leaf Collection
BookLeaf Man by Lois Ehlert

Directions
Read the book, Leaf Man by Lois Ehlert.  Let your child know you are going to go on a leaf hunt and collect a variety of beautiful, colorful autumn leaves.  Once you return from your walk, lay the leaves out on a table to examine, sort, count, and make designs and pictures. Preschool age children will expecially enjoy trying to make faces, animals, and other pictures using the leaves. 

Playdough and Cheerios

Materials
Ball of playdough (we used brown chocolate scented playdough for Brown Week)
Long pieces of uncooked spaghetti
Cheerios

Directions
Place balls of playdough on a hard surface. Provide uncooked spaghetti and Cheerios. Invite your child to explore with the materials, placing the spaghetti into the playdough and threading Cheerios onto it.  

This is a great activity for practicing eye/hand coordination and strengthening the pincer grasp, which is a fine motor skill needed for writing.

Shake, Rattle, and Roll (6 months and up)

Materials
Small, emply, clean plastic bottles (spice bottles, make-up remover bottles)
Sand, dried beans, pebbles, cereal, etc.

Directions
Fill the small plastic bottles with various noise-making materials. Secure the top with glue and/or duct tape. Place the containers in front of your baby. Encourage him to pick up and shake the containers.  He will be amazed at the different sounds they make. 

This toy boosts awareness of cause and effect, listening, and helps your baby grow in his sense of rhythm.