Blue and Gold Spaghetti

Materials:      
1 lb. spaghetti
Vegetable oil
Blue food coloring
Yellow food coloring
Large pot
Water
Colander
Two gal. Ziploc bags

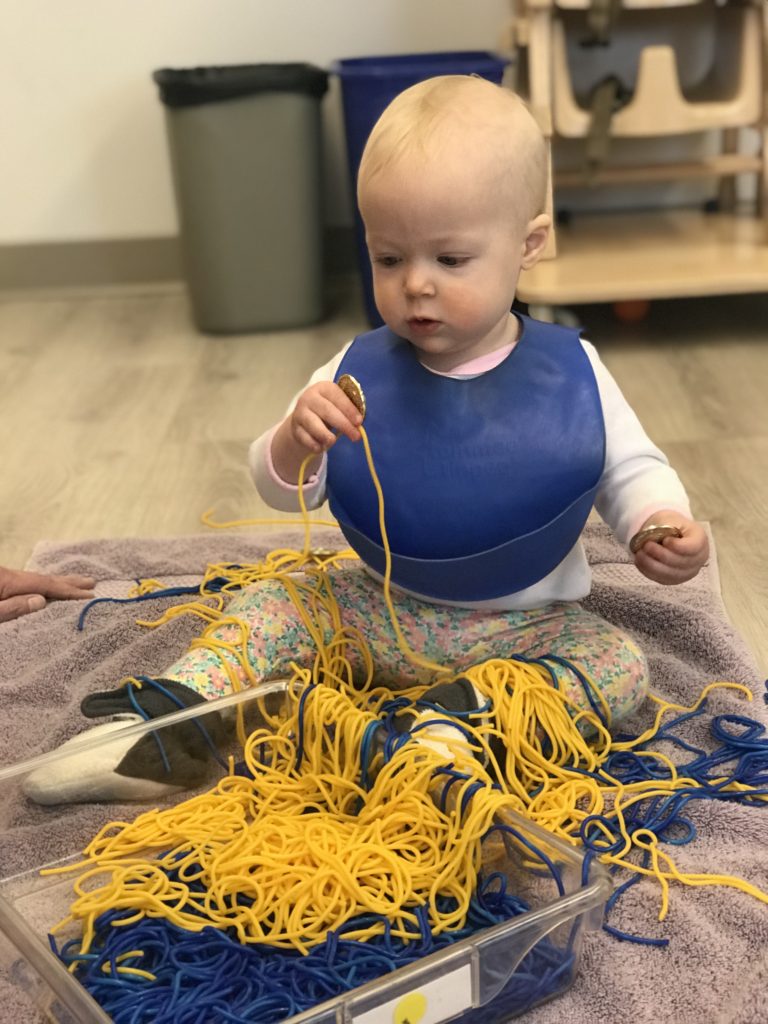
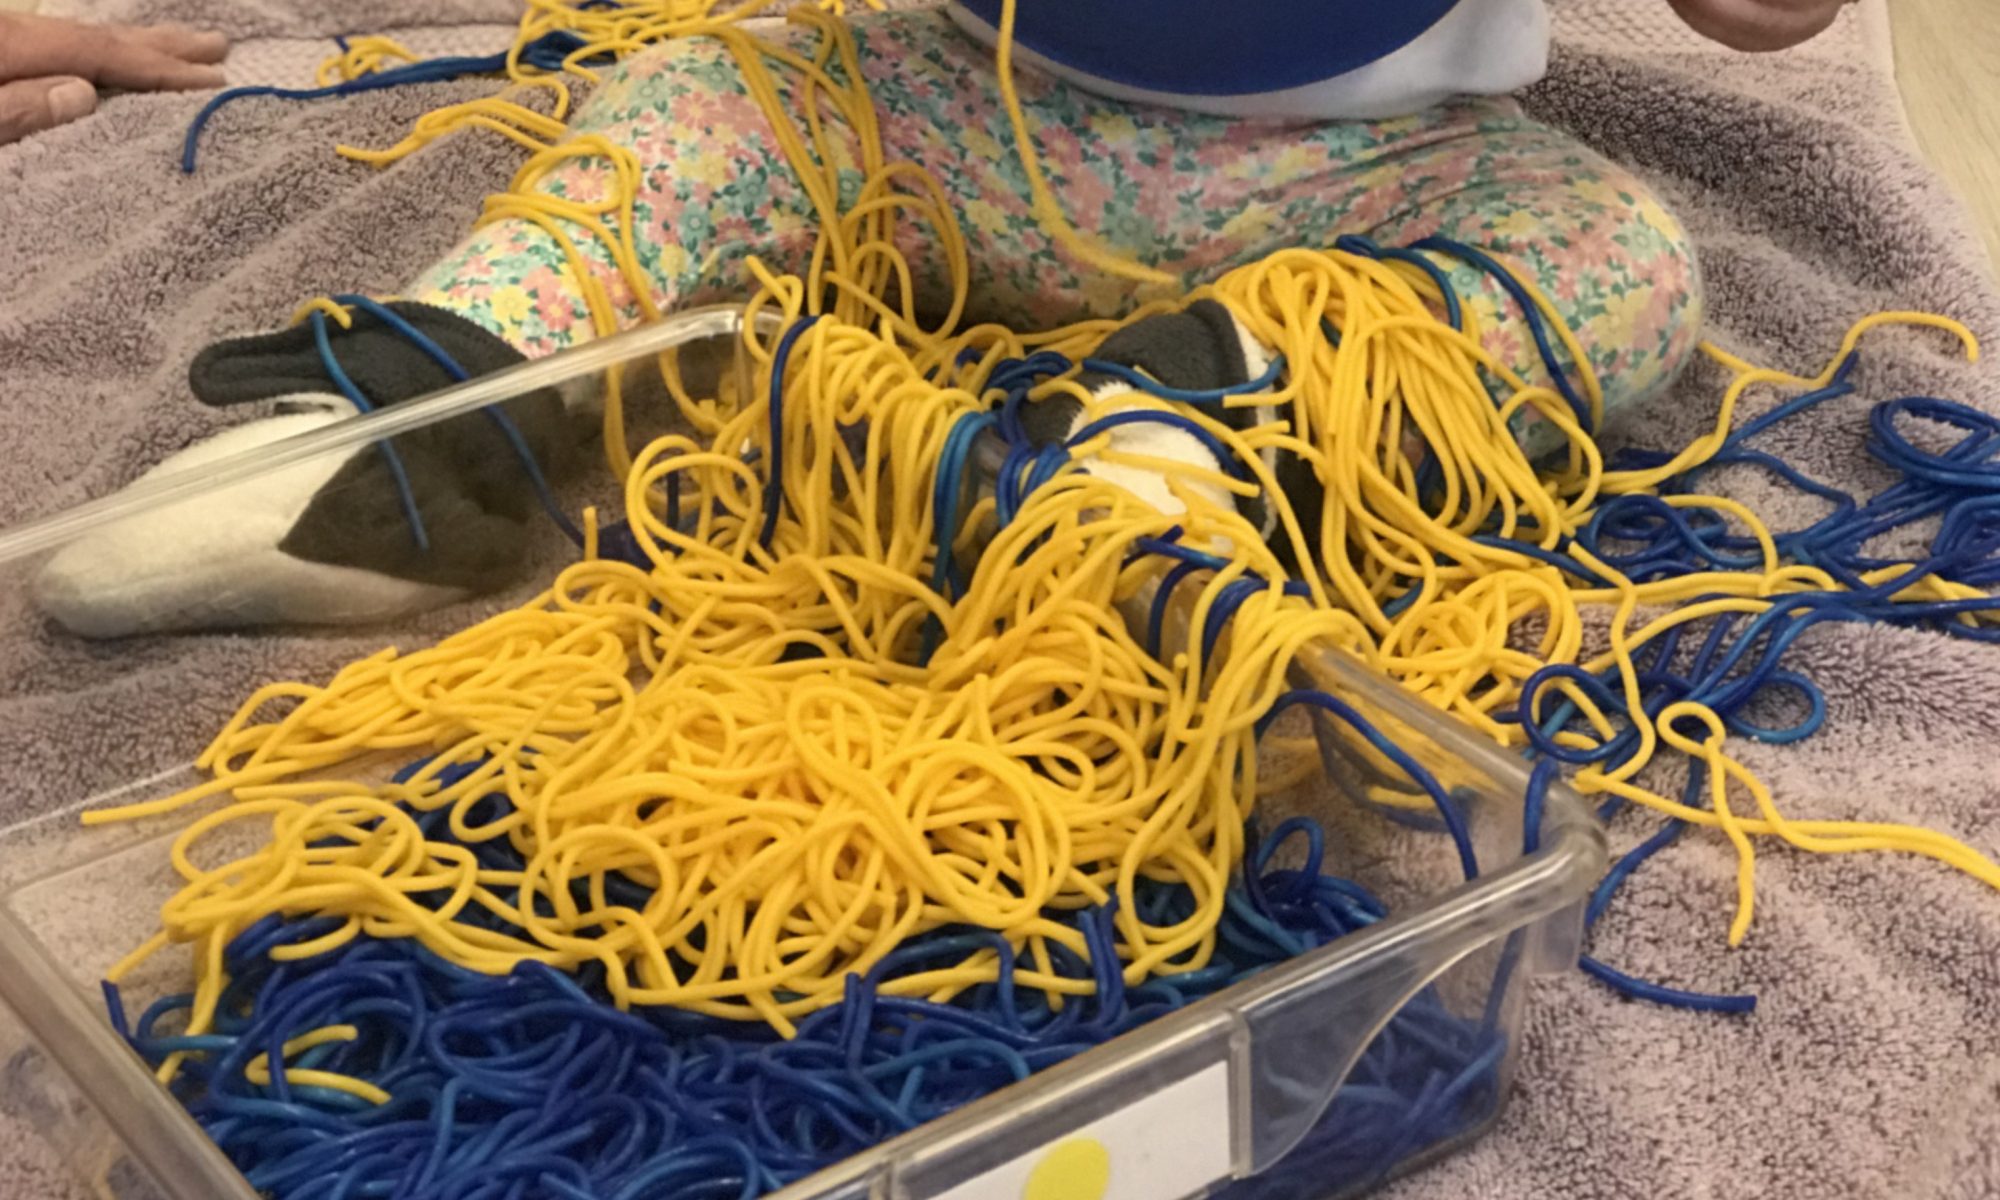
Instructions:    Fillthe pothalf full with water. Add a tablespoon of the veg. oil to the water and bring it to a boil.  Add half of the spaghetti and cook according to package directions.  When cooked, add the blue food coloring to the water and let the spaghetti soak for a few minutes, stirring the pot so the coloring is mixed in evenly.  Drain the spaghetti in the colander and rinse with cold water to set the color.

Fill the pot halfway again,  add another tablespoon of oil and let it come to a boil again.  Add the rest of the spaghetti, cooking it according to directions, about 8 minutes.  Add the yellow food coloring, stirring it in so it covers evenly.  Let the spaghetti sit for a few minutes.  Transfer the blue spaghetti to one of the Ziploc bags, seal it, and put it in the refrigerator.  Rinse the colander, then drain the yellow batch and rinse with cold water.  Put it in the 2nd Ziploc bag.  When you’re ready to let your baby play with it, pour the two bags into a plastic container or large bowl.  Set out a bath towel and place the container in the middle of it.  Set your baby on the towel, too.  Show him how you can pick up the strands of spaghetti.  Encourage him to do the same.  If he chooses to eat some, it’s perfectly safe.  We added some plastic gold coins and some blue poker chips to the spaghetti for the baby to discover.  She definitely preferred the gold coins!

Blue and Gold Trail Mix

Ingredients:    
Cheerios cereal
Mini Saltine Crackers
Goldfish Pretzels
Mini marshmallows
Blue m&m’s
Gold m&m’s
Dried fruit (pineapple, raisins, cherries, etc.)
Teddy Grahams

Instructions:    Measurements are up to your personal preference, but we used the Cheerios as about half of the mixture.  Kids like Cheerios and will eat them!  We added the other ingredients using a ¼ – 1/3 cup scoop.  You’ll want to adjust the amounts based on the number of children you’re serving.  Mix together with a spoon and serve on a napkin.  Yummy!

Zebra Stripes

Materials:      

9” x 12” sheet of white construction paper

9” x 12” sheet of black construction paper

 Glue stick

  Children’s book with pictures of zebras

Instructions:    If your child has never seen a zebra at the zoo, be sure to look for a children’s book about zebras, or google a short video about zebras. You can find several on YouTube. After seeing several pictures of zebras, tell your child you’re going to make some stripes that look just like zebras! Take the black sheet of paper, and holding it lengthwise, demonstrate how to rip the paper in strips, starting at the top and going down to the bottom. It doesn’t matter how wide the strips are. You may have to help hold the paper at the top when your child is ripping straight down.

When he’s ripped the paper into strips, lay the first strip on the white paper. Use a glue stick all the way up and down the strip and stick it to the white paper. Take another strip, apply the glue stick, and stick it next to the first strip, leaving a strip of white space in between. Continue to glue more strips, being sure to leave some white space in between. When you’re done, I think you’ll agree it looks like zebra stripes!

You can make tiger stripes by using orange construction paper with black strips of construction paper.

Pinching the paper at the top and tearing it downward is an excellent fine-motor exercise. Encourage your child to tear all the strips first. Applying the glue is also a pre-writing skill. Make sure to apply enough glue stick and press firmly so the stripes stay on the zebra!

Truck Tracks

Materials:      

A large sheet of paper

Masking tape

Black tempera paint

A shallow plastic container for the paint

A few paper towels, folded to fit in the paint container

Toy cars or trucks with textured tires

Instructions:  Use the masking tape to secure the paper to the table.  Butcher paper, newsprint, or even gift wrap (the white side of it) are good choices for paper. Dampen the folded paper towels and lay them in the plastic container. Pour the black tempera paint on the paper towel and spread it over the paper towels. “Drive” one of the trucks across  the black paint; then show your child what happens when it’s driven on the paper.  Invite your child to choose a truck and try it with you. Have fun!

Roll, Count, and Build

Materials:      

A large die

Small blocks (at least 20) in a basket 

2 players

Instructions:    In addition to counting practice, this simple game introduces young children to game-playing etiquette. Show your child the die. If you don’t have a bigger one, you can cover a cube shaped box with paper and make your own dots on each side. A Dollar Store will also likely have dice for children.  Any size die will work. It’s just easier to count the dots on an over-sized one.

Show your child how to drop the die on the table.  I use a shallow lid from a shoe box to drop the die into, to eliminate picking it up off the floor. Have him count the dots on the top of the die, using his finger to touch each dot as he counts. Take that number of small blocks from the basket and line them up on the table in front of him. Explain to him that now it’s your turn. Drop the die into the box lid, count the dots, also touching them, and take that number of blocks from the basket, lining them up in front of you.  Continue taking turns dropping the die, counting, and adding the correct number of blocks to your queue. Decide how many blocks you need to get to win. I’d start with 10 for younger children; maybe 15 or 20 for 5-year-olds. It’s a short game, but a great way to get young children to count, practicing one-to-one correspondence, which they do as they touch the dots and say the number! 

Helpful hint:  Before you play, let your child explore the blocks. Explain how to make a long “train” of blocks. Can he count the blocks in his train? Let him stack blocks. How high can he build it? If you expose your child to the blocks first, the novelty will wear off a little bit, and he’ll more likely be able to concentrate on the game.

Roll It Down the Ramp

Materials:      

Ramp

Basket of items to roll down the ramp: balls, blocks, small cars, plastic jars, paper tubes (i.e., toilet paper) large beads, plastic rings, etc.

Instructions: Set up a ramp for your little one.  It can be a board resting on a stool, or even a piece of cardboard elevated on another box. Place the basket of items by the top of the ramp. Choose something from the basket and roll it down the ramp. Invite your child to do the same. He might need some guidance with some of the items, for example, the plastic rings. When we tried this activity at school, one of the boys took a ring and tried to skim it down the ramp. It didn’t go very far. He tried it again with the same result.  He went for something else in the basket to try. I took the ring and rolled it on its edge down the middle of the ramp. It actually went pretty far!  My friend wanted to try rolling it, too. He was a bit wobbly in his efforts, but eventually succeeded. Any items that are round, have wheels or are cylindrical will go pretty far! When he’s emptied the basket, invite him to help pick everything up so he can do it again!

Grilled Cheese Roll-Ups

Ingredients:    

1 slice of bread for each roll-up

1 cheese slice per roll-up

1 Tablespoon melted butter

Pastry brush or spreader for the butter

Rolling pin

Cutting board

Frying pan (We used an electric skillet.)

Tongs

Instructions:  Place a piece of bread on the cutting board. Let your child use the rolling pin to roll the bread as flat as they can get it. Once flat, let your child place a cheese slice on the bread and roll it up tight. It will stay together by itself. Use the pastry brush dipped in the melted butter to coat the outside of the roll-up. Place the roll-up in the pan and grill it, using the tongs to turn it so it’s golden brown all over. Enjoy it plain, or dipped in catsup! Makes a good snack or lunch!

Black Fluffy Slime

There are lots of great slime recipes out there, but this is one we tried recently and the kids really liked it. It was stretchy, and not sticky!

Ingredients: 

1 cup white glue 

¼ cup hot water

Food coloring

1 tsp. baking soda

 Shaving cream (about 1 ½ cups)

 Saline solution for contact lenses (must contain sodium borate)

Mix the glue and water together in a medium bowl, then add the food coloring. Mix in enough to create a shade a little darker than you’d like, because the shaving cream will lighten the final color a bit. Mix in the baking soda thoroughly. Squirt in about 1 ½ cups shaving cream straight from the can (shake it well, first!) I don’t measure the shaving cream—I just have an idea of how much 1 ½ cups is and squirt it in. Mix well!  If you add too much your slime will be extra fluffy—not a bad thing! Finally, mix in the contact solution. Add about 1 tablespoon at a time. The glue mixture will start to congeal as the contact solution does its thing! I end up adding about 1/8 cup, total. Keep mixing  with a spoon until the slime starts to separate from the sides of the bowl; then use your hands to mix some more. If it’s still sticky, pour a little contact solution on your hands, rub them together and continue mixing. 

A couple of tips:

  • Be sure your child washes his hands after playing with the slime.
  • Beware of adding too much contact solution. You’ll know you’ve used too much if the slime suddenly breaks when it’s being stretched!
  • The slime will lose some of its “fluffiness” after a day or two as the air escapes from the shaving cream, but it will still be stretchy and fun to play with.
  • Your slime will keep for over a month in a plastic container with a tight-fitting lid.

Two-tone Sugar Cookies

Ingredients

  • 2-3/4 cups all-purpose flour
  • 1 teaspoon baking soda
  • 1/2 teaspoon baking powder
  • 1 cup butter, softened
  • 1-1/2 cups white sugar
  • 1 egg
  • 1 teaspoon vanilla extract
  • Black food coloring
  • Circle-shaped cookie cutter

Directions: Preheat the oven to 375°. In a small bowl, stir together flour, baking soda, and baking powder. Set aside.

In a large bowl, cream together the softened butter and sugar until smooth. Beat in egg and vanilla. Gradually blend in the dry ingredients.

Divide the dough into two equal portions. Add several drops of the black food color to one of the portions and blend thoroughly.

Make ½-inch dough balls, one from the regular dough, the other using the black dough.  Place the two balls side-by-side in the cookie cutter, and using your fingers, press the dough flat so it fills the cutter. Remove the dough from the cookie cutter and place on an ungreased cookie sheet. Continue until your cookie sheet is filled. These cookies will spread while baking, so be sure to leave adequate space between cookies.

Bake for 8–10 minutes in the preheated oven. Let cool for two minutes before removing cookies to a cooling rack. Enjoy!

Stuff the Bottle

Materials:

Clear plastic bottle (a Voss water bottle works well)
Black & white items to insert into the bottle—for example, golf tees, pompoms, beads, buttons, cut straws, etc.

Directions:

Present your baby with a basket of items to put into the bottle.  
Demonstrate by dropping something in the bottle. Invite your baby to drop something in the bottle.  Encourage your child to keep adding more items, occasionally adding one yourself to keep him interested.  
When he’s done (or all the items are in the bottle) show him how to shake the items out of the bottle. Sometimes it takes a lot of shaking! If he’s still interested, do it again!