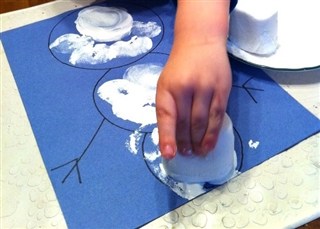
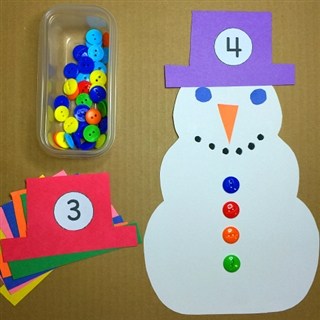
Snowman Button Counting

Materials
White and various colors of contruction paper
Black Sharpie marker
Buttons

Directions
Cut out snowman shape from white construction paper.  Use Sharpie marker to add details. Cut 10 hat shapes out of various colors of construction paper.  Write a numeral on each of the hats (1-10).  Invite your child to place a hat on top of the snowman, identify the numeral, and place the corresponding number of buttons onto the snowman.  Encourage your child to work through all the hats and place them in numerical order.

Additional lessons:
Cut our 26 snowman.  Write an upper case letter on the bottom of each snowman.  Cut out 26 hats and write a different lower case letter on each hat.  Invite your child to match the upper case letter with its lower case letter by placing the correct hat on each snowman.

Polar Bear Process Art

Materials
Newsprint paper
Finger paint paper
Blue and white tempera paint                                    Paint Smock
Water in a plastic tub
Polar Bear Template

Directions
Cover your workspace by taping newspaper to the table. From newsprint paper, cut out a polar bear shape and place it in a shallow pan of water. Once the paper is wet, allow excess water to drip off and lay the polar bear in the center of a piece of finger paint paper. It will “stick” to the finger paint paper. (Finger paint paper resists water and is sturdier for this activity.) Help your child spoon some blue and white tempera paint onto the finger paint paper and mixing the colors with their fingers and covering the whole paper with paint. Once the paper is covered with paint, allow the paint to set for a few minutes.  Then carefully help your child peel off the polar bear shape.  He will be excited to see the white polar bear shaped in the middle of the painting. Dry completely and display. 

Read, Polar Bear, Polar Bear, What Do You See? by Eric Carle

Marshmallow Snowman Painting

Materials
Mini Marshmallows
Campfire Giant Marshmallows
Dark Colored Construction Paper
White tempera paint

Directions
Draw a snowman shape onto a piece of construction paper.  Invite your child to dip the larger marshmallows into the paint and fill in the snowman shape.  Use the mini marshmallows to make snowflakes. Once the paint has dried, encourage your child to add details like eyes, mouth, nose, buttons, hat, scarf, and mittens using a Q-tip dipped in black paint and various colors of construction paper.

Mitten Math

Materials
Craft foam mittens (you can make these yourself or purchase pre-cut mittens)
Snowflake stickers or counters
Permanent marker

Directions
Using a permanent marker, write a numeral 1 or 2 on the bottom of several mittens. Provide stickers or counters (ex. buttons) and invite your toddler to place 1 sticker or counter on the mittens that have the numeral 1 written at the bottom and two stickers or counters on the mittens that have the numeral 2 written at the bottom.  Continue to reinforce numeral 1 and numeral 2 with your toddler.  Look for those numerals around the house.

Lesson Extension for Preshoolers
Using a permanent marker, write a numeral 1-10 on the bottom of each mitten.  Invite your preschooler to place the correct number of stickers to match the numeral on each mitten.  Once each mitten has the correct number of stickers, ask your child to arrange the mitterns in correct numerical order. 

Similar games can be made by printing an upper case letter on one mitten and it’s corresponding lower case letter on another mitten.  Invite your preschooler to match upper case and lower case letters. 

Sorting Snowballs (Cotton Balls)

Materials
2-3 plastic containers or small bowls
2-3 different size cotton balls, white pom poms
Tongs
Tray

Directions
For todders, use just two sizes of cotton balls  or white pom poms. Place two containers or small bowls on a tray with a pair of tongs and the “snowballs”. Invite your child to sort the snowballs, using the tongs to put the small ones in one container and the large ones in the other container.  Introduce big and small or large and small.

To add a level of difficulty, provide a third container and a third size of cotton balls or white pom poms.  Now invite your child to sort the “snowballs” by small, medium, and large. This is an excellent way to extend the activity for preschoolers.

“Snow” – Seek and Find

Materials
Styrofoam packing peanuts
Large tub or container
Small toys to find (cars, animals, magnetic letters, etc.)
Small scoops, plastic trowels, plastic bowls, etc.

Directions

Hide several small objects in a large tub or plastic container. Fill the container with styrofoam packing peanuts. Invite your child to scoop the “snow” to fill buckets and bowls, and to search for the hidden toys or objects. How many can he find? Count the objects.

Snow Slime

Materials
2 cups Elmer’s glue
1 can shaving cream
Liquid starch

Directions
Place Elmer’s glue in a large bowl. Add one can of shaving cream and stir. Mix in liquid starch 1 tablespoon at a time until it loses its stickiness and you can mix it with your hands. The slime will be pliable and very fluffy, though it loses its fluffiness after 24 hours. Store in a loosely covered bowl on the counter.

Hanging Mittens

Materials
Several pairs of mittens in a large container
Small clothesline 
Clothespins

Directions
Invite your child to look for pairs of mittens in the container and then hang the mittens on the clothesline using clothespins.  This is an excellent activity for strengthening small muscles in the fingers.

Counting Snowballs

Materials
Blue construction paper
Sharpie marker
Cotton balls
Tongs

Directions
Write a numeral on each piece of construction paper.  Place a bowl of cotton balls in front of your child. Invite your child to use the tongs to count out the correct number of cotton balls to match each numeral on the pieces of construction paper.

For toddlers:  Focus on numerals 1 and 2.
For preschoolers:  Provide your child with numerals 1-10.  Once your child has identified the numeral and placed the correct number of cotton balls on the paper, encourage your child to put the papers in numerical order.

Shivery Snow Paintings

  • Shaving Cream
  • White school glue
  • Peppermint extract
  • Iridescent glitter 


Directions
Begin by placing the shaving cream and glue in the refrigerator for several hours or overnight.  When ready to make the paint, allow glue to sit out on the counter for about ten minutes so the glue will flow more easily.  

Next, mix equal parts of the chilled glue and shaving cream in a bowl.  This is a rough estimate; it’s a bit of a guessing game.  Sprinkle in glitter to make it sparkly. Add a few drops of peppermint extract and mix.  

Invite your child to paint on construction paper using a paint brush or sponge brush. To finish, sprinkle more glitter on top of the wet paint.

Once dry, the creations will be puffy to the touch!  The paint may also be used as a FUN sensory snow experience.  Give your little one a few scoopers and other gadgets, and he will have a great time exploring the shivery, oh so puffy, snow.