Games and Activities for Infants (Birth – 6 months)

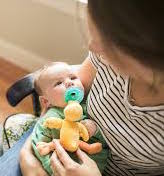
The first six months with your baby is a special, precious time, as your baby transforms from a floppy-headed newborn into a tiny person who can sit and play when propped up. While babies will develop at their own pace, there are ways you can encourage their growth. 

Some games and activities include:

1. LISTENING

What to do: Sing and talk to your child using exaggerated tones of voice. Watch your baby’s facial expressions and see how he reacts to different pitches.

Skills learned: Language development

2. TRACKING

Materials needed: A small, soft, colorful toy, like a sponge ball or stuffed animal.

What to do: While your baby is lying on her back, hold the toy in front of her face and, if needed, wiggle it slowly or gently touch her with it to get her attention. Then move the toy from side to side, and encourage her to follow along with her eyes.

Skills learned: Visual tracking, visual development

3. DANCING

Materials needed: Music

What to do: Put on one of your favorite songs and, while holding your baby securely to your chest, gently move around together in time to the music.

Skills learned: Listening.  Dancing also encourages an interest in music and strengthens bonding with the parent.

4. SINGING

What to do: Next time your little one is having a meltdown or resisting a nap, sing him a hymn or lullaby in a soothing voice. 

Skills learned: Listening, emotional regulation

5. REFLECTIONS

Materials needed: Baby-safe mirror

What to do: Show your baby her reflection in the mirror, then ask, “Who is that?” Repeat with your own reflection and a sibling’s or a stuffed animal’s.

Skills learned: Visual, social, and emotional development

6. BABY SIT-UPS

What to do: If your baby has good head control, lay him on his back, place your hands under his arms, and gently guide him into a sitting position. As he gains muscle tone and strength, do these sit-ups by holding his hands and slowly bringing him to sit.

Skills learned: Motor skills, head control


7. FOLLOW THE LEADER

What to do: See how many actions your child can imitate in a row by tapping the table, opening and closing your hands, clapping, and waving. Tip: Start with something your baby is already doing, like banging a fist on the table.

Variations: Increase the challenge by adding new and more complex movements, but pay attention to your baby’s reactions. Scale back if she seems frustrated—the activity should be fun.

Skills learned: Imitation, back-and-forth conversation, memory

8. FLYING

What to do: Lay your baby tummy-down across your lap, and place your hands around his midsection so he’s fully supported. Then gently lift him up and move him up, down, back, and forth, like a rocket jetting into space. For extra giggles, add sound effects. This activity allows your baby to see the world from a different perspective, and there’s a gleeful aspect to that.

Skills learned: Body movement and stimulation

9. KICKING

Materials needed: Tissue paper

What to do: Tuck one or two sheets of new or used tissue paper under the cushion of a sofa or upholstered chair so that it hangs down to the floor like a curtain. Remove baby’s socks, and place her on her back, with her feet against the tissue and her knees slightly bent. Gently rustle the paper with your hand or tap her feet against it. Watch as your baby learns to play the game on her own.

Skills learned: Body awareness, cause and effect, sensory integration
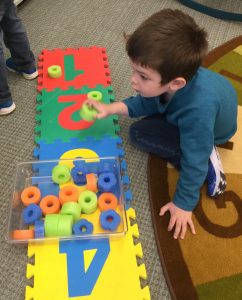
11. GRABBING BASKET

Materials needed: Empty paper towel or toilet paper tubes cut into 1- to 2-inch rings, a low basket or a shallow pan

What to do: Fill the basket or pan with the paper tube rings, and place it in front of your baby while she’s in tummy time, propped on a pillow, or sitting on your lap with hands free to play. Encourage her to push and bump her hands up against the rings or use use the wall of the container to help her grasp them.

Variations: Swap out the cut tubes with ribbon strips or bath puffs to provide a different tactile sensation. (Always keep eyes on your baby and keep her within arm’s reach when using ribbons.) Golf balls are another fun filler, as they make a great noise when placed in a metal pan.

Skills learned: Grasp and release, tactile stimulation, hand-eye coordination

Fun with Flowers

Materials:
Assortment of artificial flowers (these can be purchased at a Dollar Store)
Colander

Directions:
Invite your child to choose one flower at a time and poke the stem of the flower through a hole in an inverted colander.  Watch as a beautiful floral arrangement unfolds! 

Spring Wreaths

Materials
Paper plate
Green tempera paint
Sponge brush or wand


Directions
Cover the table surface with large paper or use newspaper.  Cut large hole in center of paper plate so the plate resembles a wreath.  Pour a small amount of green paint into a plastic container or pie tin.  Invite your child to dip the sponge brush or wand into the paint and dab onto the paper plate.  Cover the entire plate.  Once the paint has dried, encourage your child to decorate the wreath with bright, colorful spring shapes.  Use foam shapes, stickers, cut out flowers from construction paper, etc.

Worm Painting with Spaghetti

Materials
1 handful of cooked spaghetti (cooled)
Tempera paint
Paper plates for paint
1 piece of construction paper
newspaper to cover the work surface

Directions
Cover the table or work space with newspaper. Pour a small amount of tempera paint on to the paper plates – one color per plate. Drop a few spaghetti noodles onto each plate. Invite your preschooler to pick up a few pieces of spaghetti and place them on the construction paper. Encourage your child to explore with the spaghetti and the paint. Once your child has finished painting, allow the paint to dry, discard the spaghetti and paints.

Garden Sensory Tub

Materials
Potting soil
Flowers (artificial or cut)
Rocks
Shovels
Pots
Plastic bin
Small plastic shovels and rakes

Directions
Pour a bag of potting soil in a bin. Add some rocks, artificial flowers, and small shovels, rakes, and pots. Invite your child to dig and explore.

Dirt Cups

Ingredients
1 pkg. (3.9 oz.) JELL-O Chocolate Flavor Instant Pudding
2 cups cold milk
1 tub (8 oz.) COOL WHIP Whipped Topping, thawed
15 OREO Cookies, finely crushed (about 1-1/4 cups), divided
10 worm-shaped chewy fruit snacks
Small artificial flowers (optional)

Directions
Beat pudding mix and milk in large bowl with whisk 2 min. Let stand 5 min. Stir in COOL WHIP and 1/2 cup cookie crumbs.
Spoon into 10 (6- to 7-oz.) plastic cups; top with remaining cookie crumbs.
Refrigerate 1 hour. Top with fruit snacks just before serving. Stick artificial flowers into the dessert, if desired. Enjoy!

Dirt and Worms Sensory Tub

Materials
Large plastic tub
Dirt
Worms
Sand toys such as trowels, small rakes, and buckets
Child’s magnifying glass
Small watering can
Apple core or banana peel

Directions
Fill the tub with a bag of dirt. After a spring rain, go on a worm hunt with your preschooler. Collect the worms in a small container and then add them to the dirt. You can also purchase earthworms from a bait store. Provide sand toys such as a trowel, rake, small bucket, watering can, and a child’s magnifying glass. Invite your child to explore, examine, and observe the worms in the dirt.  What happens when a small amount of water is added to the dirt? Add the apple core or banana peel to the dirt.  Cover when not exploring.

Research with your preschooler what worms need to survive.  Here’s a child friendly video to help your child learn a little more about earthworms.

Flower Printing

Materials
Temperal Paint in spring colors
Large White Paper
Green marker
Fluffy silk flowers (like carnations)
Paper plates

Directions
Pour paint onto paper plates. Cut the stems of the silk flowers down to the size of a small paint brush (approximately 6 inches). Tape the large white paper to the table, and using the green marker invite your child to draw green stems and leaves or you draw green stems and leaves. Then invite your child to dip a silk flower into one of the colors of paint and tap it on the paper.  Encourage using a different flower for each color paint. Allow painting to dry and display.

Counting and Stacking

Materials
Styrofoam pool noodle, cut in 1 inch slices (from the Dollar Store)
Large number line or number cards from 1-6
One die

Directions
Using a shart knife, cut a styrofoam pool noodle into 1 inch slices. Lay the number line or number cards in front of your child. Go over the numerals together. Invite your child to roll the die, count the dots on the die, and then find the matching numeral. Have him make a tower with the correct number of styrofoam pool noodles on the matching numeral. Continue playing until all the numerals have been covered. 

For preschool and kindergarten age children, use two or even three dice.

Frozen Yogurt Dots

Ingredients

Directions

  1. Fill plastic or piping bag with yogurt flavor of your choice. Snip the corner of the bag off to create a hole approximately 1/2 inch in diameter.
  2. Pipe small one inch dabs of yogurt in rows on a parchment paper-lined baking sheet.
  3. Place in freezer for at least 4 hours before eating. If you want to keep them longer, leave them on the baking sheet overnight, then remove and place in an airtight container.  The frozen yogurt dots will keep in the freezer for at least a week.