Ice Cream in a Sandwich Bag

Materials
2 Ziploc sandwich bags
1 Ziploc gallon bag
Chocolate syrup (or vanilla flavoring and about a tablespoon of sugar)
Salt (Ice cream salt or rock salt works best, but table salt works, too.)
Heavy whipping cream
Ice cubes 
Directions
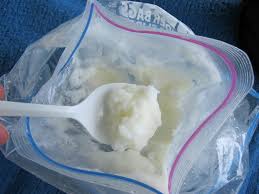
Fill a sandwich-sized Ziploc bag with 1/2 cup of cream and some chocolate syrup (or vanilla flavoring and a a little bit of sugar, if your child prefers vanilla ice cream). Seal the bag tightly. Place that bag inside another sandwich bag and place the double bagged mixture inside a gallon bag. Fill the gallon bag with lots and lots of ice. Then add more ice. Add 1/4 cup salt to the ice. Seal the gallon Ziploc bag and place it into a plastic grocery bag. The bag gets very cold, so the grocery bag will really help!
Then, invite your child to shake the bag.  Shake it vigorously for 8  minutes. Try dancing while you shake!  Shake, toss, and roll! Just keep it moving for the 8 minutes.  
When you’re done dancing, carefully remove the innermost bag, being careful not to get any of the ice/salt water into the bag. Inside that bag is the ice cream, a soft-serve consistency. Enjoy eating it immediately since it melts fast — or place it in the freezer for later.


Nature Cutting Tray

Materials
Blades of grass, leaves, flower petals, etc.
Scissors
Tray (Melissa and Doug Puzzles storage trays work well)

Directions
Invite your child to snip, cut, and manipulate the different items for cutting purposes.  This activity is best done with young children who already have a general grasp on holding scissors, since cutting limp grass and soft petals and turning leaves to cut different angles takes patience, control, and persistence. 

This activity is also a great sensory experience for your child.  Smelling different flowers, mint leaves, and other spices, feeling various textures, and observing the many colors in the tray makes for a rich sensory experience. 

Sandal Painting


Materials
Washable paint 
Paintbrushes
Sandals, Crocs, and/or flip-flops
Butcher paper

Directions
Invite your child to choose a sandal or flip-flop that he or they would like to use to make prints. Encourage using a paintbrush to paint the bottom of a shoe and then press it onto the butcher paper. The soles of the sandals have such interesting patterns and textures, which makes them fun to paint and stamp on the butcher paper!

When done in a small group, this activity is a wonderful cooperative art project, as children negotiate paint colors, navigate around each other, and swap sandals. 

Process art, such as this, is more about collaborating and making the art rather than the outcome. Process art gives children the freedom to explore, experiment, and enjoy the activity without preconceived notions about how it is “supposed” to look. 


Abstract Window Art

Materials
Colored Transparency Sheets (can sometimes be purchased at the Dollar Store)
Scissors
Paper Trimmer (optional)
Shallow tray with water

Directions
Cut the transparency sheets into various sizes using scissors and a paper trimmer. Once the shapes are cut out, invite your child to dip the various pieces of colored transparencies into water and press them to the window where the sun can shine through.  Layering the colors is a great opportunity for discussing color mixing, as the layered sheets create different colors.

This activity is also a great way to work on fine motor skills.

So Big!

Active Infant Game

Hold your baby on your lap, facing you, or place him sitting or lying down on a blanket facing you. Ask: How big is (child’s name)? Then lift his arms up into the air and say: Sooooo big! 

Babies love this game and will eventually learn to lift their arms in response to your question.

Red, White, and Blue Jell-O Stars

Ingredients

2 x 3-ounce boxes of “Berry Blue” Jell-O
2 x 3-ounce boxes of cherry-flavored Jell-O
1 x 1-ounce box of Knox gelatin (4 envelopes)
14 ounces sweetened condensed milk

Directions

Spray a 9 x 13 dish with cooking spray. Set aside.

To make first layer: Pour Berry Blue Jell-O mixes, 1 envelope of Knox gelatin, and 2 cups of HOT water into a large bowl. Mix to combine. CAREFULLY pour mixture into dish. Place dish into refrigerator until set. Approximately 20–30 minutes.

To make second layer: Into a large bowl pour 2 envelopes of gelatin, 3/4 cup HOT water, 1/4 cup COLD water. Mix to combine. Into a separate bowl add: sweetened condensed milk and 1 cup HOT water. Mix to combine. CAREFULLY pour milk mixture into gelatin mixture. Mix to combine. SLOWLY pour white layer on top of BLUE layer. Return to refrigerator to set up, approximately 20–30 minutes.

To make third layer: into a large bowl pour cherry Jell-O mixes, 1 envelope of Knox gelatin, and 2 cups of HOT water. Mix to combine. CAREFULLY pour mixture into dish. Place dish into refrigerator until set, approximately 20-30 minutes.

Once final layer is set, use a star cookie cutter to cut into stars. (Or, if you prefer, simply cut into squares).

Patriotic Slime

Ingredients:
1/2 Cup of Elmer’s Washable PVA Clear Glue or White Glue 
1/4 Cup of Liquid Starch
1/2 Cup of Water
Food coloring, confetti, glitter, and other fun mix-ins in red, white, and blue

Directions:
In a small bowl, mix 1/2 cup Elmer’s Washable Clear Glue with 1/2 cup of water.  Add any mix-ins or food coloring (glitter, red, white and blue sequins, confetti stars, etc. ) Mix well. Add 1/4 cup liquid starch and stir.  Once the slime thickens and pulls away from the sides of the bowl, knead it. 

This is a fun science  and sensory activity.  Store in airtight container.  If the slime gets sticky, add a small amount of liquid starch. 

Taste Safe Ice Painting

Materials
Small yogurt cups or paper cups
Gel Food Coloring
Water
Craft sticks
Cardstock

Directions
To make taste safe ice paint begin by filling small yogurt cups or paper cups with water.  Mix a small amount of gel food coloring into the water.  Put a craft stick into each cup and then put the cups into the freezer. Freeze completely.

Once the ice has frozen take the ice paints out of the cups and allow your little one to get painting. 
TIP: If you are struggling to get the ice paint sticks out of the cups run them under warm water.

S’Mores Rice Krispies Treats

Ingredients
1/4 cup butter
4 cups of miniature marshmallows
5 cups of Rice Krispie cereal
1 package chocolate chips

Directions
  1. Melt butter in large sauce pan over low heat. Add marshmallows and stir until melted and well-blended. 
  2. Add cereal. Stir until well coated.
  3. Stir in package of chocolate chips.
  4. Using buttered spatula or waxed paper, press mixture evenly and firmly in buttered 13 x 9 inch pan. Cut into 2 x 2 inch squares when cool.


Bugs, Frogs, and Nature Sensory Tub

Materials
Dirt to cover bottom of a plastic tub
Small plastic bowl for a pond
Plastic insects and frogs
Small rocks, twigs, leaves
Spoons

Directions
Fill the tub with dirt, water in the bowl for the pond, plastic insects, frogs, twigs, rocks, and leaves. Provide a few spoons and invite your child to explore and feel different textures. Introduce new vocabulary.