My Purple Book

Purple book

Materials
Construction paper cut into rectangles (approximately 4×6)
Pictures of purple objects (cut from magazines or clip art)
Glue stick
Stapler
Marker

Inside purple bookDirections
Cut pictures of purple objects from magazines or clip art.  Invite your child to choose one picture to glue on each 4×6 piece of construction paper.  Talk about each object and label each page (e.g. purple grapes, purple buttons, purple hat, etc.) Once the pages are complete, staple them together to make a book.  Add a cover with the title, “My Purple Book”.  Read the book frequently to your child and have her read the book to you, too.

Purple Crowns

Purple crowns

Materials
12×18 piece of purple construction paper
Small objects to decorate crown (e.g. plastic jewels, sequins, stickers, feathers)
Glitter
Glue
Stapler

Directions
Cut construction paper in half lenthwise to be 6×18.  Invite your child to decorate the front of the paper by gluing feathers, jewels, foam pieces, stickers, etc.  Sprinkle the crown with a little glitter to make it sparkly. Once the glue is dry, wrap the paper around your child’s head and staple to make a crown.  It can be as simple or elaborate as your child would like it to be.

Purple Gak

Gak
Ingredients
2 cups glue
1 ½ cups water
2 teaspoons Borax
Red and blue food coloring
 
Directions
Combine glue, water, and red and blue food coloring to make a purple mixture. In a larger bowl, dissolve Borax in one cup of hot water. Slowly add the glue mixture to the Borax. Mix well. It will thicken quickly. Pour off excess water and put in a shallow tray. Allow to dry for 10 minutes. Your child will enjoy squeezing and stretching the gak.Be sure to have your child was hands after playing with the gak.

 
Store in a Zip-loc bag. Keeps for 2-3 weeks.

Purple Monsters

Materials
Large piece of purple construction paper
Googly eyes, feathers, purple easter grass, purple foam pieces, purple pipe cleaners
Glue

Directions

Cut a large circle out of purple construction paper. Invite your child to create a purple monster face by gluing the materials onto the large circle.

Purple Purse

Purple purse

Inspired by the book, Lilly’s Purple Plastic Purse by Kevin Henkes

Materials
Long piece of purple construction paper (approximately 6×15)
Pipe cleaner or ribbon to make the handle
Stickers, pictures cut out of a magazine, or clip art
Markers
Glue
Tape
Small piece of velcro (optional)

Directions
Another purple purse
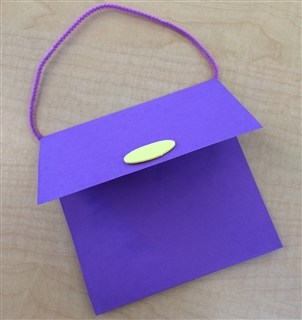
Fold the bottom of the construction paper so it reaches about 3 inches from the top.  Fold the top down to look like a purse.  Use a pipe cleaner or ribbon and attach each end underneath the fold to make a handle for the purse.  Secure with tape.   (Optional) Stick a small piece of velcro underneath the flap and on the purse to act like a latch for holding the purse closed. Open and unfold the purse and invite your child to glue various pictures and stickers inside. Ask your child to tell you what he has in his purse.

Preschool age children may want to draw their own pictures or label the pictures in the purse.

Purple Swirls

Materials
Milk
Liquid Dish Soap
Red Food Coloring
Blue Food Coloring
Shallow Dish
Directions
Pour cold milk into a shallow dish. Add 1 drop of red food coloring to one side of the bowl and 2 drops of blue food coloring to the other side. Then, add a drop or two of liquid dish soap to the center of the bowl and watch what happens. (You should see the colors begin to swirl and move.)
If the colors stop moving, you can add another drop of soap. Eventually, the colors will mix together to form purple. It does take a bit of time to occur, so you may want to give the mixture some help by stirring it until you get a good purple color.

Sorting Purple Circles

Purple paper circles

Materials

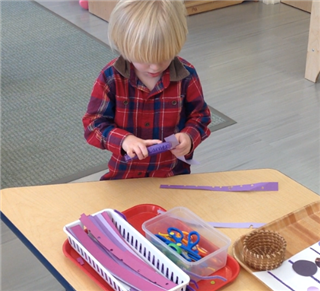
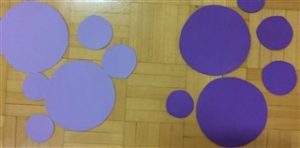
Purple construction paper (light and dark colors)
Scissors
2-3 size circular objects to trace around

Directions

On purple paper, trace around 2-3 different circle shapes.  Cut out circles.

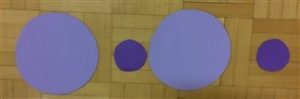
Invite your child to sort the circles into two groups:  big and little
Sort using a different criteria:  light purple circles and dark purple circles

For an added challenge, encourage your child to copy your pattern.  Then she can try extending the pattern that you have started with the circles.  Once your child understands that a pattern repeats, invite your child to create their own pattern.

Using a Hole Puncher

Hole puncher

Materials
Strips of purple construction paper approximately an inch wide and 5-6 inches in length
Hole puncher

Directions
Place strips of purple paper in a basket or on a small tray with a hole puncher.  Encourage your child to punch holes along a strip of paper, starting from the left side and moving across the paper towards the right end of the strip.

This simple fine motor activity is excellent for developing eye and hand coordination and strengthening the child’s fingers and hands.  It also supports learning to manipulate scissors and will aid in naturally guiding your child to move from left to right across the paper, an important skill needed for reading.

Food for Toddlers

After a baby’s first year, growth slows down and so does the appetite.  Here is a list of foods to try with your toddler.  Present food as good, rather than good-for-you.  Have happy mealtimes. Encourage without urging, forcing, or rewarding a child to eat.

Finger Foods

 
Toddlers enjoy the independence of eating by themselves.  Eating with fingers is a good way to give this independence before baby has the skill to use utensils.  As baby sees you eating with utensils, he’ll want to develop his skill.  Start with a child’s spoon for spoon foods.

Fruit – cut into appropriate sizes

  • Apples, peeled – raw or cooked
  • Bananas
  • Blueberries
  • Canned fruit and fruit cocktail
  • Canned Mandarin oranges
  • Cantaloupe
  • Dried fruits softened by soaking in a little hot water (or they can be chopped)
  • Figs
  • Grapefruit sections
  • Grapes, halved or quartered
  • Kiwi, peeled
  • Oranges, sectioned
  • Peaches, peeled
  • Pears
  • Plums
  • Strawberries, halved
  • Sweet cherries, halved and pitted
  • Watermelon 

Vegetables

  • Cooked asparagus tips
  • Ripe avocado
  • Steamed broccoli
  • Carrots, steamed or grated
  • Cooked Cauliflower
  • Celery, with strings removed
  • Cooked green beans
  • Shredded lettuce
  • Cooked mushrooms
  • Slightly cooked green peas
  • Potatoes, mashed or french fries (oven-baked)
  • Cooked squash, zucchini and yellow
  • Tomatoes, peeled 

Meats

  • Beef roast, sliced thin or ground
  • Crisp bacon
  • Chicken or turkey, diced or sliced very thin
  • Frankfurters cut in small pieces that could not cause choking
  • Ham, cut into bite-sized pieces
  • Hamburger, meat balls, or meat-loaf pieces
  • Lamb
  • Luncheon meats
  • Tuna
  • Veal 

Dairy

  • Cottage cheese (add fruit, or blend and make into dip.  Serve on crackers)
  • Cream cheese on cracker or bagel
  • Eggs, scrambled, or hard-boiled, deviled, omelets
  • Mild cheese – small pieces, or grated

Breads

  • Arrowroot cookies
  • Bagels
  • Biscuits
  • Bread pudding
  • Breads – white or dark
  • Cereals, hot or cold, unsweetened varieties (with or without milk)
  • Cooked pasta (noodles, macaroni – different shapes and colors, spaghetti, ravioli, and         many others)
  • Cookies – oatmeal, or plain
  • Corn bread
  • French toast fingers
  • Graham crackers – plain or with peanut butter
  • Milk toast
  • Pretzels – without excess salt
  • Sandwiches – egg salad, lunch meat, tuna or chicken salad, peanut butter and jelly and many more
  • Soda crackers
  • Toast strips, with a little butter
  • Zwieback
 

Other Toddler Foods

Drinks 

  • milk
  • eggnog
  • fruit juice
  • milk
  • fruit juice blends 

Spoon foods

  • Casseroles of meat or fish, vegetables, and pasta
  • Cereal with fruit
  • Cooked spinach
  • Custards or puddings
  • Eggs (soft-cooked, baked with milk, creamed hard boiled)
  • Gelatins
  • Ice cream
  • Junket
  • Soups
  • Tapioca or rice pudding
  • Yogurt (plain, vanilla, or mixed with baby fruits)

Cornstarch Goo

Cornstarch goo creation

Materials: 

Layers of newspaper to cover work space
Large bowl or plastic container
1 cup cornstarch
½ cup of water
Food coloring (optional)
 

Instructions:

Pour 1 cup of cornstarch into plastic bowl or container. Slowly add ½ cup of water (add food coloring to water if making colored goo).  Mix cornstarch and water with your hands.  Add just enough water so that the cornstarch and water mix will flow very, very slowly.
 
Things to try:
  • Pour it from hand to hand. If you go slowly, it will pour freely.
  • Pick up a handful and squeeze it. Stop squeezing and it will drip through your fingers.
  • Roll it into a ball. Then stop rolling. The goo will trickle away between your fingers.
  • Bounce it!Smack it with a spoon. If you hit the mixture really hard, it might even break.
  • Rest your fingers on the surface and let them sink down to the bottom of the bowl. Try to pull them out fast.What happens?
  • Put a small plastic toy on the surface. Does it stay there or does it sink?
Store cornstarch goo in a Zip-loc baggie.
 
IMPORTANT: The cornstarch goo will not stay mixed indefinitely. Once the cornstarch has separated from the water and has formed solid clumps in the bottom of the storage bag, dispose of in the garbage.  Never pour the mixture down the drain as it will clog the pipes.